この記事では、MongoDBを使用したCRUD(Create, Read, Update, Delete)操作を行うWEBアプリケーションの構築方法を学ぶことができます。プロジェクトのセットアップから、各ファイルの作成、そしてコードの詳細な解説まで網羅しています。
はじめに
Expressを使用するには、Node.jsのインストールが必要です。
MongoDB をまだインストールしていない場合は、公式サイトからインストールしてください。
プロジェクトのセットアップ
- 任意の場所でディレクトリを作成して、ディレクトリ内に移動をします。
mkdir express-mongodb-crud
cd express-mongodb-crud- プロジェクトの初期化:
npm init -y- 必要なパッケージのインストール:
npm install express mongooseプロジェクト構造の作成
フォルダ階層:
express-mongodb-crud/
│
├── public/
│   ├── index.html
│   ├── js/
│   │   └── client.js
│   └── css/
│       └── styles.css
│
├── models/
│   └── Post.js
│
├── node_modules/
│
├── app.js
├── package.json
└── package-lock.json
ファイルの内容
<!DOCTYPE html>
<html lang="ja">
  <head>
    <meta charset="UTF-8" />
    <meta name="viewport" content="width=device-width, initial-scale=1.0" />
    <!-- ページのタイトルを設定 -->
    <title>ブログ投稿 CRUD アプリ</title>
    <!-- 外部CSSファイルをリンク -->
    <link rel="stylesheet" href="/css/styles.css" />
  </head>
  <body>
    <!-- アプリケーションのルート要素 -->
    <div id="app"></div>
    <!-- クライアントサイドJavaScriptファイルを読み込み -->
    <script src="/js/client.js"></script>
  </body>
</html>/* ボディ全体のスタイリング */
body {
display: flex;
justify-content: center; /* 水平方向の中央揃え */
align-items: center; /* 垂直方向の中央揃え */
height: 100vh; /* ビューポートの高さいっぱいに設定 */
margin: 0; /* デフォルトのマージンを削除 */
font-family: Arial, sans-serif; /* フォントファミリーの設定 */
}
/* アプリケーションのメインコンテナ */
#app {
width: 80%; /* 親要素の80%の幅 */
max-width: 600px; /* 最大幅を600pxに制限 */
}
/* フォームのスタイリング */
form {
display: flex;
flex-direction: column; /* 子要素を縦方向に配置 */
gap: 10px; /* 子要素間の間隔 */
}
/* 入力フィールド、テキストエリア、ボタンの共通スタイル */
input,
textarea,
button {
padding: 10px; /* 内部の余白 */
margin-bottom: 10px; /* 下部のマージン */
}public/js/client.js:
フロントエンドのロジックを担当。ユーザーインターフェースの生成と、APIとの通信を管理。
// APIのエンドポイントURLを定義
const API_URL = "http://localhost:3000/posts";

// フォームを生成する関数
function createForm(id, title, action) {
  return `
        <h2>${title}</h2>
        <form id="${id}">
            <input type="text" id="${id}Title" placeholder="タイトル" required>
            <textarea id="${id}Content" placeholder="内容" required></textarea>
            <button type="submit">${action}</button>
        </form>
    `;
}

// 投稿要素を生成する関数
function createPostElement(post) {
  return `
        <div>
            <h3>${post.title}</h3>
            <p>${post.content}</p>
            <button onclick="editPost('${post._id}')">編集</button>
            <button onclick="deletePost('${post._id}')">削除</button>
        </div>
    `;
}

// ページを初期化する関数
function initializePage() {
  const app = document.getElementById("app");
  // メインコンテンツを設定
  app.innerHTML = `
        <h1>ブログ投稿 CRUD アプリ</h1>
        ${createForm("createForm", "新規投稿", "投稿")}
        <h2>投稿一覧</h2>
        <div id="postsList"></div>
        <div id="updateFormContainer"></div>
    `;

  // 新規投稿フォームの送信イベントを設定
  document
    .getElementById("createForm")
    .addEventListener("submit", handleCreate);

  // 投稿一覧を取得
  getPosts();
}

// 投稿一覧を取得する関数
function getPosts() {
  fetch(API_URL)
    .then((response) => response.json())
    .then((posts) => {
      const postsList = document.getElementById("postsList");
      // 投稿要素を生成して表示
      postsList.innerHTML = posts.map(createPostElement).join("");
    })
    .catch((error) => console.error("Error:", error));
}

// 新規投稿を処理する関数
function handleCreate(e) {
  e.preventDefault(); // フォームのデフォルト動作を防止
  const title = document.getElementById("createFormTitle").value;
  const content = document.getElementById("createFormContent").value;

  fetch(API_URL, {
    method: "POST",
    headers: { "Content-Type": "application/json" },
    body: JSON.stringify({ title, content }),
  })
    .then((response) => response.json())
    .then(() => {
      getPosts(); // 投稿一覧を更新
      e.target.reset(); // フォームをリセット
    })
    .catch((error) => console.error("Error:", error));
}

// 投稿編集フォームを表示する関数
function editPost(id) {
  fetch(`${API_URL}/${id}`)
    .then((response) => response.json())
    .then((post) => {
      const updateFormContainer = document.getElementById(
        "updateFormContainer"
      );
      // 編集用フォームを生成して表示
      updateFormContainer.innerHTML = createForm(
        "updateForm",
        "投稿更新",
        "更新"
      );
      document.getElementById("updateFormTitle").value = post.title;
      document.getElementById("updateFormContent").value = post.content;
      // 編集フォームの送信イベントを設定
      document
        .getElementById("updateForm")
        .addEventListener("submit", (e) => handleUpdate(e, id));
    })
    .catch((error) => console.error("Error:", error));
}

// 投稿の更新を処理する関数
function handleUpdate(e, id) {
  e.preventDefault(); // フォームのデフォルト動作を防止
  const title = document.getElementById("updateFormTitle").value;
  const content = document.getElementById("updateFormContent").value;

  fetch(`${API_URL}/${id}`, {
    method: "PUT",
    headers: { "Content-Type": "application/json" },
    body: JSON.stringify({ title, content }),
  })
    .then((response) => response.json())
    .then(() => {
      getPosts(); // 投稿一覧を更新
      document.getElementById("updateFormContainer").innerHTML = ""; // 編集フォームをクリア
    })
    .catch((error) => console.error("Error:", error));
}

// 投稿の削除を処理する関数
function deletePost(id) {
  if (confirm("本当に削除しますか?")) {
    // 確認ダイアログの表示
    fetch(`${API_URL}/${id}`, { method: "DELETE" })
      .then(() => getPosts()) // 投稿一覧を更新
      .catch((error) => console.error("Error:", error));
  }
}

// ページ初期化処理の実行
initializePage();models/Post.js:
MongoDBのデータ構造を定義。投稿のモデルを作成し、データベースとの相互作用の基礎を提供。
// Mongooseライブラリをインポート
const mongoose = require("mongoose");

// ブログ投稿のためのMongooseスキーマを定義
const PostSchema = new mongoose.Schema({
  // 投稿のタイトル
  title: String,

  // 投稿の本文内容
  content: String,

  // 投稿の作成日時
  createdAt: {
    type: Date,
    default: Date.now, // デフォルト値として現在の日時を設定
  },
});

// スキーマを使用してMongooseモデルを作成し、エクスポート
module.exports = mongoose.model("Post", PostSchema);app.js:
バックエンドサーバーを設定。データベース接続とRESTful APIエンドポイントを実装し、クライアントリクエストを処理。
// 必要なモジュールをインポート
const express = require("express");
const mongoose = require("mongoose");
const Post = require("./models/Post");

// Expressアプリケーションを初期化
const app = express();

// ミドルウェアの設定
app.use(express.json()); // JSONリクエストボディの解析
app.use(express.static("public")); // 静的ファイルの提供

// 環境変数からデータベースURLを取得、なければデフォルト値を使用
const MONGODB_URI = process.env.MONGODB_URI || "mongodb://localhost/blogdb";

// MongoDBに接続
mongoose
  .connect(MONGODB_URI)
  .then(() => console.log("MongoDB connected"))
  .catch((err) => console.error("MongoDB connection error:", err));

// Create: 新しい投稿を作成
app.post("/posts", async (req, res) => {
  try {
    const post = new Post(req.body);
    await post.save();
    res.status(201).json(post);
  } catch (error) {
    res.status(400).json({ message: error.message });
  }
});

// Read: すべての投稿を取得
app.get("/posts", async (req, res) => {
  try {
    const posts = await Post.find();
    res.json(posts);
  } catch (error) {
    res.status(500).json({ message: error.message });
  }
});

// Read: 特定の投稿を取得
app.get("/posts/:id", async (req, res) => {
  try {
    const post = await Post.findById(req.params.id);
    if (!post) return res.status(404).json({ message: "Post not found" });
    res.json(post);
  } catch (error) {
    res.status(500).json({ message: error.message });
  }
});

// Update: 投稿を更新
app.put("/posts/:id", async (req, res) => {
  try {
    const post = await Post.findByIdAndUpdate(req.params.id, req.body, {
      new: true, // 更新後のドキュメントを返す
      runValidators: true, // 更新時にバリデーションを実行
    });
    if (!post) return res.status(404).json({ message: "Post not found" });
    res.json(post);
  } catch (error) {
    res.status(400).json({ message: error.message });
  }
});

// Delete: 投稿を削除
app.delete("/posts/:id", async (req, res) => {
  try {
    const post = await Post.findByIdAndDelete(req.params.id);
    if (!post) return res.status(404).json({ message: "Post not found" });
    res.json({ message: "Post deleted successfully" });
  } catch (error) {
    res.status(500).json({ message: error.message });
  }
});

// サーバーを起動
const PORT = process.env.PORT || 3000;
app.listen(PORT, () => console.log(`Server running on port ${PORT}`));
package.json:
プロジェクトの基本的な構造と依存関係を定義
{
  "name": "express-mongodb-crud",
  "version": "1.0.0",
  "description": "",
  "main": "app.js",
  "scripts": {
    "start": "node app.js",
    "test": "echo \"Error: no test specified\" && exit 1"
  },
  "keywords": [],
  "author": "",
  "license": "ISC",
  "dependencies": {
    "express": "^4.21.1",
    "mongoose": "^8.7.2"
  }
}
アプリケーションの起動:
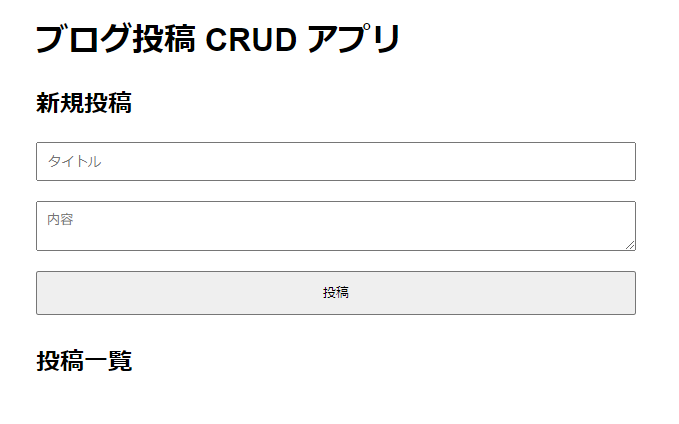
node app.jsブラウザで http://localhost:3000 にアクセスして、アプリケーションを使用します。
アプリケーション画面:
アプリのテスト手順
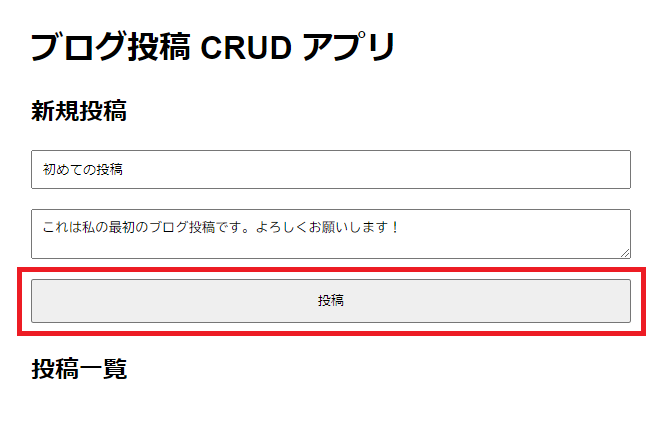
新規投稿を作成(Create)
- 入力内容:
- タイトル: 初めての投稿
- 内容: これは私の最初のブログ投稿です。よろしくお願いします!
「投稿」ボタンをクリックします。
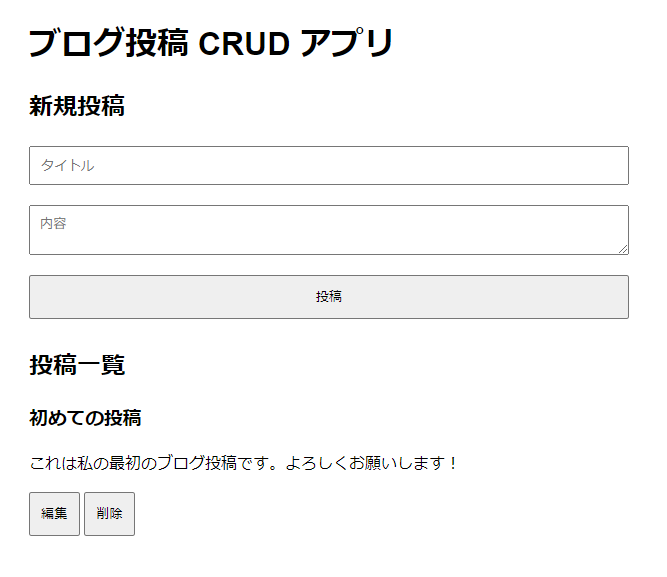
投稿一覧を表示(Read)
作成した投稿一覧に表示されていることを確認します。
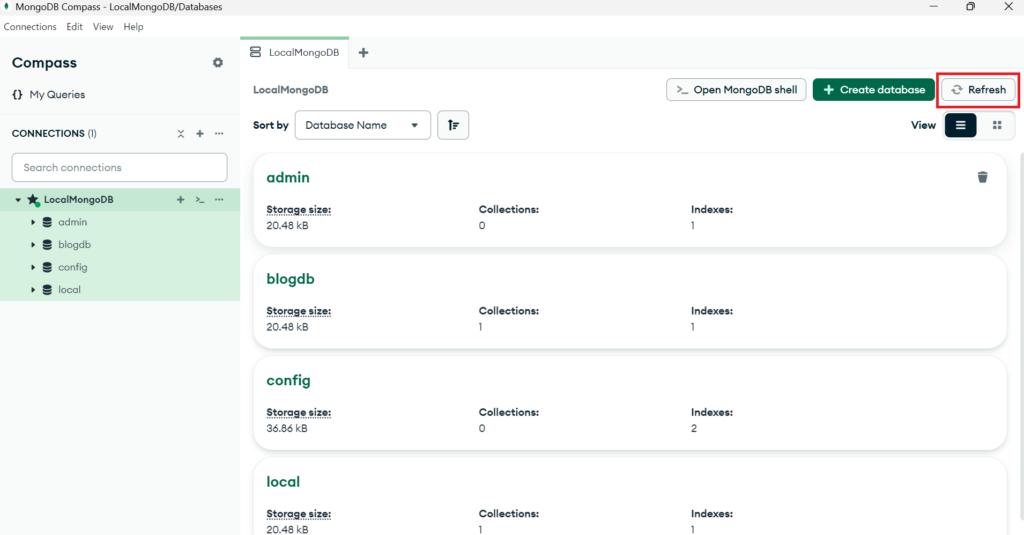
MongoDB Compassを起動
MongoDB Compass内のデータベースの状態も確認します。
「blogdb」の項目が表示されたら成功です。
※表示されない場合は、右上の「Refresh」で更新してください。
「posts」、「Documents」を選択して、投稿を確認します。
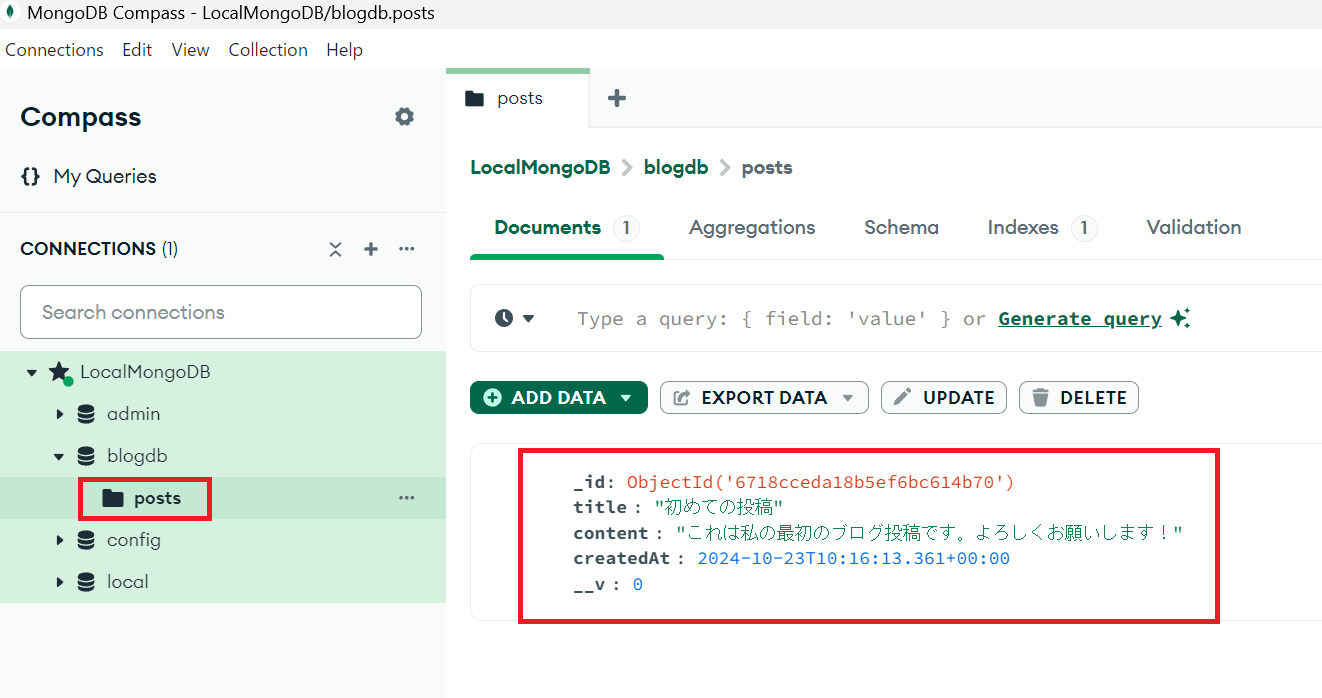
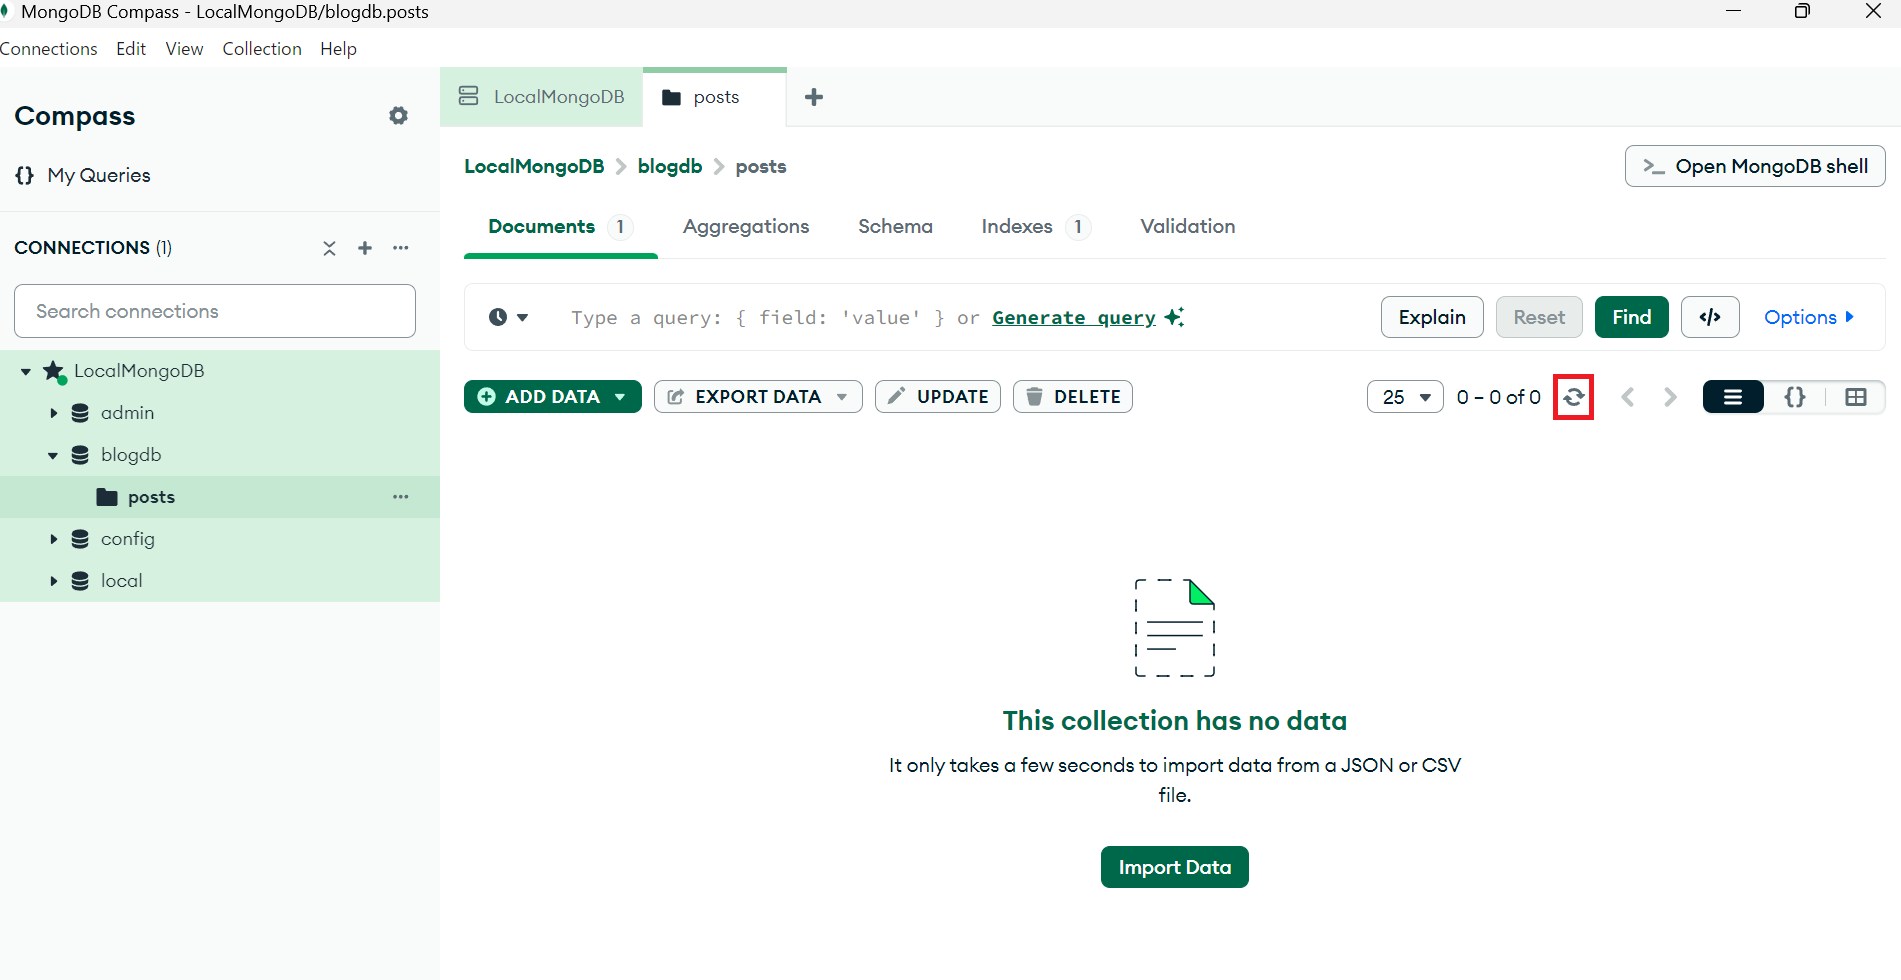
反映されない場合は、更新マークをクリックしてください。
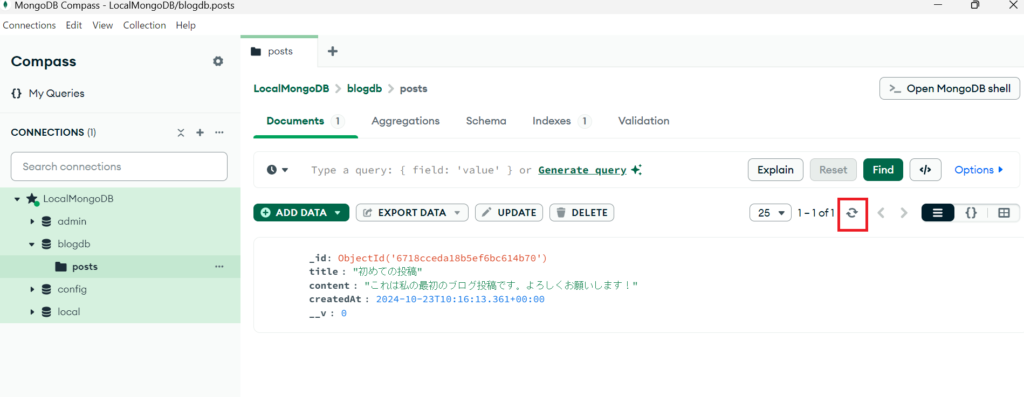
投稿を編集(Update)
「編集」ボタンをクリックします。
- 入力内容:
- タイトル: 更新された初めての投稿
- 内容: この投稿を編集しました。ブログ作成は楽しいですね!
「更新」ボタンをクリックします。
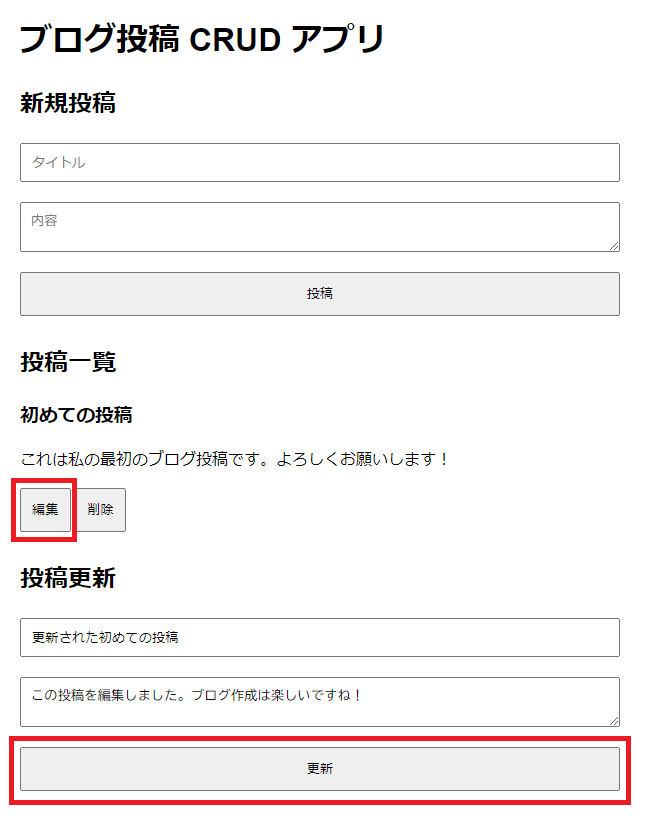
編集後の投稿一覧に正しく表示されていることを確認します。
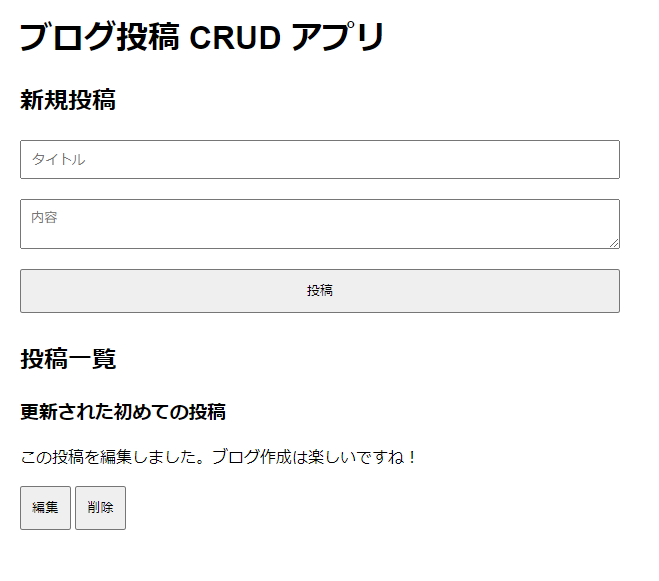
データベースでの更新確認をします。反映されない場合は、更新マークをクリックしてください。

投稿を削除(Delete)
削除したい投稿の「削除」ボタンをクリックします。
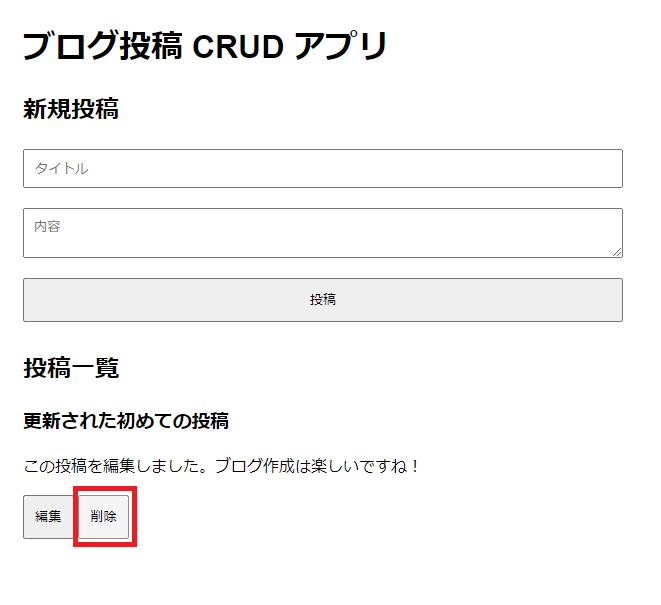
確認のアラートが上部に表示されるので、「OK」をクリックします。

削除後、投稿一覧から消えたことを確認します。
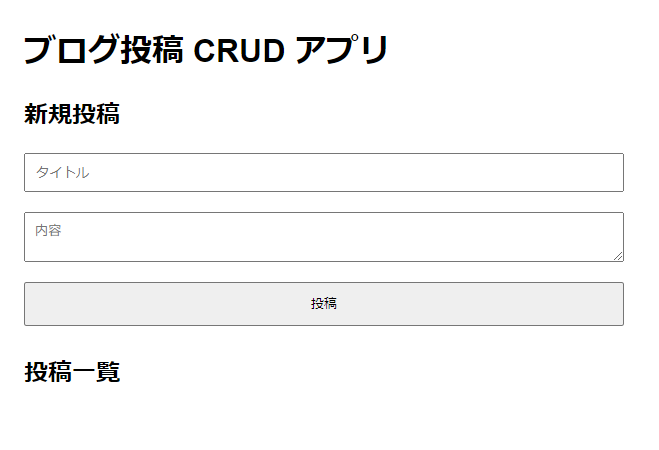
データベースの削除を確認をします。反映されない場合は、更新マークをクリックしてください。
複数の投稿を作成してCRUD操作を繰り返しテスト
新規作成、編集、削除の操作を複数回実施します。
この手順に従ってテストを行うことで、アプリケーションの基本的なCRUD機能が正常に動作するか確認できます。
コードの解説
public/index.htmlの解説
- <div id=”app”></div>: これは、JavaScriptによって動的にコンテンツが挿入される場所です。
id="app"は、JavaScriptからこの要素を簡単に見つけられるようにするためのものです。 - <script src=”/js/client.js”></script>: 外部JavaScriptファイル(client.js)をこのHTMLファイルに読み込みます。このスクリプトが、ページの動的な機能を提供します。
このHTMLファイルは、シングルページアプリケーション(SPA)の基本的な構造を提供しています。実際のコンテンツはJavaScriptによって動的に生成され、<div id="app"></div>の中に挿入されます。CSSファイルがページのスタイルを定義し、JavaScriptファイルがインタラクティブな機能を提供します。
public/css/styles.cssの解説
bodyのスタイル:- 画面中央にコンテンツを配置
- 画面全体を使用
- フォントをArialに設定
#app(メインコンテナ)のスタイル:- 幅を親要素の80%に設定
- 最大幅を600pxに制限
formのスタイル:- 子要素を縦に並べる
- 子要素間に10pxの間隔を設定
- 入力要素(input, textarea, button)の共通スタイル:
- 内部に10pxの余白を追加
- 下部に10pxのマージンを設定
public/js/client.jsの解説
APIのエンドポイントURLを定義
const API_URL = "http://localhost:3000/posts";この定数は、アプリケーションがデータを取得・送信するバックエンドサーバーのURLを定義しています。localhost:3000は開発環境でよく使用されるアドレスで、/postsはブログ投稿に関するエンドポイントを示しています。実際の運用環境では、この URL は本番サーバーのアドレスに変更されます。
フォームを生成する関数
function createForm(id, title, action) {
  return `
        <h2>${title}</h2>
        <form id="${id}">
            <input type="text" id="${id}Title" placeholder="タイトル" required>
            <textarea id="${id}Content" placeholder="内容" required></textarea>
            <button type="submit">${action}</button>
        </form>
    `;
}
この関数は、再利用可能なフォームを生成します。
id: フォームの一意の識別子として使用されます。title: フォームの見出しとして表示されます。action: 送信ボタンのテキストとして使用されます。required属性は、フォームの送信前にフィールドが必ず入力されるようにします。- テンプレートリテラル(バッククォート)を使用して、動的にHTMLを生成しています。
投稿要素を生成する関数
function createPostElement(post) {
  return `
        <div>
            <h3>${post.title}</h3>
            <p>${post.content}</p>
            <button onclick="editPost('${post._id}')">編集</button>
            <button onclick="deletePost('${post._id}')">削除</button>
        </div>
    `;
}
この関数は、各投稿をHTML要素として表現します。
post.titleとpost.contentは、投稿のタイトルと内容を表示します。- 編集と削除ボタンには、
onclick属性で直接関数を呼び出すイベントハンドラが設定されています。 post._idは、各投稿の一意の識別子で、サーバーから提供されることを想定しています。
ページを初期化する関数
function initializePage() {
  const app = document.getElementById("app");
  app.innerHTML = `
        <h1>ブログ投稿 CRUD アプリ</h1>
        ${createForm("createForm", "新規投稿", "投稿")}
        <h2>投稿一覧</h2>
        <div id="postsList"></div>
        <div id="updateFormContainer"></div>
    `;

  document
    .getElementById("createForm")
    .addEventListener("submit", handleCreate);

  getPosts();
}
この関数は、アプリケーションの初期状態を設定します。
app要素のinnerHTMLを設定することで、アプリケーションの基本構造を作成します。createForm関数を呼び出して、新規投稿フォームを生成します。- 新規投稿フォームに
submitイベントリスナーを追加し、handleCreate関数と関連付けます。 getPosts関数を呼び出して、既存の投稿を取得・表示します。
投稿一覧を取得する関数
function getPosts() {
  fetch(API_URL)
    .then((response) => response.json())
    .then((posts) => {
      const postsList = document.getElementById("postsList");
      postsList.innerHTML = posts.map(createPostElement).join("");
    })
    .catch((error) => console.error("Error:", error));
}
この関数は、サーバーから投稿データを取得し、表示します。
fetch関数を使用して、非同期でAPIからデータを取得します。response.json()で、レスポンスをJSONとしてパースします。posts.map(createPostElement).join("")で、各投稿をHTML要素に変換し、それらを連結します。- エラーが発生した場合は、コンソールにエラーを出力します。
これらの関数は、モダンなウェブアプリケーションの基本的な構造と動作を示しています。非同期処理、動的なHTML生成、イベント処理などの重要な概念が含まれており、フロントエンド開発の良い学習材料になります。
新規投稿を処理する関数
function handleCreate(e) {
  e.preventDefault();
  const title = document.getElementById("createFormTitle").value;
  const content = document.getElementById("createFormContent").value;

  fetch(API_URL, {
    method: "POST",
    headers: { "Content-Type": "application/json" },
    body: JSON.stringify({ title, content }),
  })
    .then((response) => response.json())
    .then(() => {
      getPosts();
      e.target.reset();
    })
    .catch((error) => console.error("Error:", error));
}
この関数は新規投稿の作成を処理します。
e.preventDefault()はフォームのデフォルトの送信動作を防ぎます。- フォームから入力されたタイトルと内容を取得します。
fetchを使用してPOSTリクエストを送信し、新しい投稿をサーバーに作成します。headersでContent-Typeを指定し、JSONデータを送信することを示します。bodyに、タイトルと内容をJSON文字列に変換して設定します。- 投稿が成功したら、
getPosts()で投稿一覧を更新し、e.target.reset()でフォームをリセットします。
投稿編集フォームを表示する関数
function editPost(id) {
  fetch(`${API_URL}/${id}`)
    .then((response) => response.json())
    .then((post) => {
      const updateFormContainer = document.getElementById(
        "updateFormContainer"
      );
      updateFormContainer.innerHTML = createForm(
        "updateForm",
        "投稿更新",
        "更新"
      );
      document.getElementById("updateFormTitle").value = post.title;
      document.getElementById("updateFormContent").value = post.content;
      document
        .getElementById("updateForm")
        .addEventListener("submit", (e) => handleUpdate(e, id));
    })
    .catch((error) => console.error("Error:", error));
}
この関数は投稿の編集フォームを表示します。
- 指定されたIDの投稿データをサーバーから取得します。
createForm関数を使用して編集フォームを生成します。- 取得した投稿データをフォームに設定します。
- 更新フォームに
submitイベントリスナーを追加し、handleUpdate関数を呼び出すように設定します。
投稿の更新を処理する関数
function handleUpdate(e, id) {
  e.preventDefault();
  const title = document.getElementById("updateFormTitle").value;
  const content = document.getElementById("updateFormContent").value;

  fetch(`${API_URL}/${id}`, {
    method: "PUT",
    headers: { "Content-Type": "application/json" },
    body: JSON.stringify({ title, content }),
  })
    .then((response) => response.json())
    .then(() => {
      getPosts();
      document.getElementById("updateFormContainer").innerHTML = "";
    })
    .catch((error) => console.error("Error:", error));
}
この関数は投稿の更新を処理します。
- フォームから更新されたタイトルと内容を取得します。
fetchを使用してPUTリクエストを送信し、既存の投稿を更新します。- 更新が成功したら、
getPosts()で投稿一覧を更新し、編集フォームを非表示にします。
投稿の削除を処理する関数
function deletePost(id) {
  if (confirm("本当に削除しますか?")) {
    fetch(`${API_URL}/${id}`, { method: "DELETE" })
      .then(() => getPosts())
      .catch((error) => console.error("Error:", error));
  }
}
この関数は投稿の削除を処理します。
confirmダイアログで、ユーザーに削除の確認を求めます。- 確認された場合、
fetchを使用してDELETEリクエストを送信し、投稿を削除します。 - 削除が成功したら、
getPosts()で投稿一覧を更新します。
最後にページ初期化処理
initializePage();このコードは、ページが読み込まれた時に initializePage 関数を呼び出し、アプリケーションを初期化します。
このアプリケーションは、シングルページアプリケーション(SPA)の基本的な構造を示しています。RESTful APIとの通信、非同期処理、動的なDOM操作など、モダンなウェブアプリケーション開発の重要な要素が含まれています。また、コードの構造化と関数の分割により、保守性と可読性が向上しています。
models/Post.jsの解説
Mongooseのインポート
const mongoose = require("mongoose");- mongoose: MongoDBのオブジェクトモデリングツールです。これを使用してスキーマを定義し、モデルを作成します。
スキーマの定義
const PostSchema = new mongoose.Schema({
  title: String,
  content: String,
  createdAt: {
    type: Date,
    default: Date.now,
  },
});- PostSchema: ブログ投稿のデータ構造を定義するMongooseスキーマです。
- title: 投稿のタイトルを表す文字列フィールドです。
- content: 投稿の本文内容を表す文字列フィールドです。
- createdAt: 投稿の作成日時を表すDateフィールドです。
- type: Date: このフィールドがDate型であることを指定します。
- default: Date.now: ドキュメント作成時に値が指定されなかった場合、自動的に現在の日時が設定されます。
モデルの作成とエクスポート
module.exports = mongoose.model("Post", PostSchema);- mongoose.model(): スキーマを使用してMongooseモデルを作成します。
- 第一引数 “Post”: モデルの名前を指定します。これはMongoDBのコレクション名の単数形となります(実際のコレクション名は複数形の”posts”になります)。
- 第二引数 PostSchema: 使用するスキーマを指定します。
- module.exports: 作成したモデルをエクスポートし、他のファイルから使用できるようにします。
このコードの重要なポイントは以下の通りです:
- スキーマの定義: データの構造と型を明確に定義することで、データの一貫性を保ちます。
- createdAt フィールドのデフォルト値: 自動的に作成日時が記録されるため、アプリケーションのコードで明示的に設定する必要がありません。
- モデルのエクスポート: 他のファイルからこのモデルを簡単に使用できるようになります。
このモデルを使用することで、MongoDBデータベースとの間で投稿データの作成、読み取り、更新、削除(CRUD操作)を簡単に行うことができます。また、Mongooseの機能を活用して、データのバリデーションやクエリの実行なども効率的に行えます。
app.jsの解説
モジュールのインポートと初期設定
const express = require("express");
const mongoose = require("mongoose");
const Post = require("./models/Post");

const app = express();

app.use(express.json());
app.use(express.static("public"));- express: Webアプリケーションフレームワーク
- mongoose: MongoDBのODM(Object Document Mapper)
- Post: 投稿モデル(別ファイルで定義されていると想定)
express.json(): JSONリクエストボディを解析するミドルウェアexpress.static("public"): 静的ファイルを提供するミドルウェア
データベース接続
const MONGODB_URI = process.env.MONGODB_URI || "mongodb://localhost/blogdb";

mongoose
  .connect(MONGODB_URI)
  .then(() => console.log("MongoDB connected"))
.catch((err) => console.error("MongoDB connection error:", err));- MONGODB_URI: 環境変数から取得、またはデフォルト値を使用
- mongoose.connect(): MongoDBに接続
Create操作(POST /posts)
app.post("/posts", async (req, res) => {
  try {
    const post = new Post(req.body);
    await post.save();
    res.status(201).json(post);
  } catch (error) {
    res.status(400).json({ message: error.message });
  }
});- 新しい投稿を作成し、データベースに保存
- 成功時は201 Createdステータスと作成された投稿を返す
Read操作(GET /posts)
app.get("/posts", async (req, res) => {
  try {
    const posts = await Post.find();
    res.json(posts);
  } catch (error) {
    res.status(500).json({ message: error.message });
  }
});- すべての投稿を取得
- 成功時は投稿の配列を返す
Read操作(GET /posts/:id)
app.get("/posts/:id", async (req, res) => {
  try {
    const post = await Post.findById(req.params.id);
    if (!post) return res.status(404).json({ message: "Post not found" });
    res.json(post);
  } catch (error) {
    res.status(500).json({ message: error.message });
  }
});- 特定のIDの投稿を取得
- 投稿が見つからない場合は404 Not Foundを返す
Update操作(PUT /posts/:id)
app.put("/posts/:id", async (req, res) => {
  try {
    const post = await Post.findByIdAndUpdate(req.params.id, req.body, {
      new: true,
      runValidators: true,
    });
    if (!post) return res.status(404).json({ message: "Post not found" });
    res.json(post);
  } catch (error) {
    res.status(400).json({ message: error.message });
  }
});- 特定のIDの投稿を更新
new: true: 更新後のドキュメントを返すrunValidators: true: 更新時にバリデーションを実行
Delete操作(DELETE /posts/:id)
app.delete("/posts/:id", async (req, res) => {
  try {
    const post = await Post.findByIdAndDelete(req.params.id);
    if (!post) return res.status(404).json({ message: "Post not found" });
    res.json({ message: "Post deleted successfully" });
  } catch (error) {
    res.status(500).json({ message: error.message });
  }
});- 特定のIDの投稿を削除
- 成功時は削除成功メッセージを返す
サーバー起動
const PORT = process.env.PORT || 3000;
app.listen(PORT, () => console.log(`Server running on port ${PORT}`));- 環境変数からポート番号を取得、またはデフォルト値(3000)を使用
- 指定されたポートでサーバーを起動
このコードは、RESTful APIの基本的なCRUD操作を実装しており、MongoDBを使用してデータを永続化しています。エラーハンドリングやステータスコードの適切な使用など、APIの良い実践例も示されています。
package.jsonの解説
このJSONファイルは、Node.jsプロジェクトの設定を定義するpackage.jsonファイルです。
{
  "name": "express-mongodb-crud",
  "version": "1.0.0",
  "description": "",
  "main": "app.js",
  "scripts": {
    "start": "node app.js",
    "test": "echo \"Error: no test specified\" && exit 1"
  },
  "keywords": [],
  "author": "",
  "license": "ISC",
  "dependencies": {
    "express": "^4.21.1",
    "mongoose": "^8.7.2"
  }
}
プロジェクト情報:
- “name”: “express-mongodb-crud” – プロジェクトの名前です。
- “version”: “1.0.0” – プロジェクトのバージョンを示します。
- “description”: “” – プロジェクトの説明(現在は空)。
- “main”: “app.js” – アプリケーションのエントリーポイントとなるファイルです。
スクリプト:
   "scripts": {
     "start": "node app.js",
     "test": "echo \"Error: no test specified\" && exit 1"
}- “start”:
npm startコマンドでnode app.jsが実行されます。 - “test”: テストスクリプトが未定義であることを示すプレースホルダーです。
メタデータ:
- “keywords”: [] – プロジェクトのキーワード(現在は空)。
- “author”: “” – 作者情報(現在は空)。
- “license”: “ISC” – プロジェクトのライセンスタイプ。
依存関係:
   "dependencies": {
     "express": "^4.21.1",
     "mongoose": "^8.7.2"
}- express: Webアプリケーションフレームワーク。バージョン4.21.1以上が必要。
- mongoose: MongoDBのODM(Object Document Mapper)。バージョン8.7.2以上が必要。
重要なポイント:
- “main”: “app.js”: これは、アプリケーションの起動ファイルを指定しています。
app.jsがプロジェクトのメインファイルであることを示しています。 - “start” スクリプト:
npm startコマンドでアプリケーションを起動できるように設定されています。 - 依存関係: ExpressとMongooseが主要な依存パッケージとして指定されています。これは、このプロジェクトがExpressを使用したWebサーバーとMongoDBデータベース(Mongooseを介して)を利用することを示唆しています。
- バージョン指定: 依存パッケージのバージョンに「^
」が付いているのは、セマンティックバージョニングに基づいて、パッチとマイナーアップデートは自動的に受け入れるが、メジャーバージョンの変更は除外することを意味します。
このファイルは、プロジェクトの基本的な構造と依存関係を定義しており、Node.jsとnpmがプロジェクトを正しく管理し、必要なパッケージをインストールするために使用します。
まとめ
- プロジェクト構造: 必要なファイルとディレクトリの作成方法
- CRUD操作の実装: MongoDBを使用したデータの作成、読み取り、更新、削除の方法
- フロントエンド開発: HTML, CSS, JavaScriptを使用したユーザーインターフェースの構築
- バックエンド開発: Node.jsとExpressを使用したサーバーサイドの実装
- MongoDB Compassの活用: データベース操作の視覚化と確認
- コードの詳細解説: 各ファイルの役割と実装の説明
この記事は、MongoDBを使用したフルスタックウェブアプリケーション開発の包括的なガイドを提供しています。プロジェクトの設定から始まり、フロントエンドとバックエンドの開発、そしてデータベース操作までのプロセスを学ぶことができます。
特に重要なのは、CRUD操作の実装部分です。これらの操作は、ほとんどのウェブアプリケーションの基礎となるものであり、この記事ではそれらを実践的に学ぶことができます。また、MongoDB Compassを使用したデータベース操作の視覚化は、開発プロセスをより直感的にし、デバッグを容易にします。



コメント